RPCS3 Settings Guide for Uncharted: Drake’s Fortune
This tutorial will show you which custom settings to use with Uncharted: Drake’s Fortune on the RPCS3 (PlayStation 3) emulator. These settings are what I personally use. As always, your results may vary.
Known Problems that I Experienced
- FPS drop when shaders get compiled (nothing you can really do about that)
- FPS drop when a lot of activity is on the screen (e.g., several enemies on the screen at once)
- Texture pop-in
- Texture flicker
Prerequisites
- Latest copy of RPCS3 (Download Page)
- A copy of Uncharted: Drake’s Fortune for use with the emulator.
- A fairly beefy computer (for best performance; can work on slower computers).
- A PlayStation controller (preferred) or an Xbox controller (connected via wired or wireless).
- First off, add the game to RPCS3 to get started.

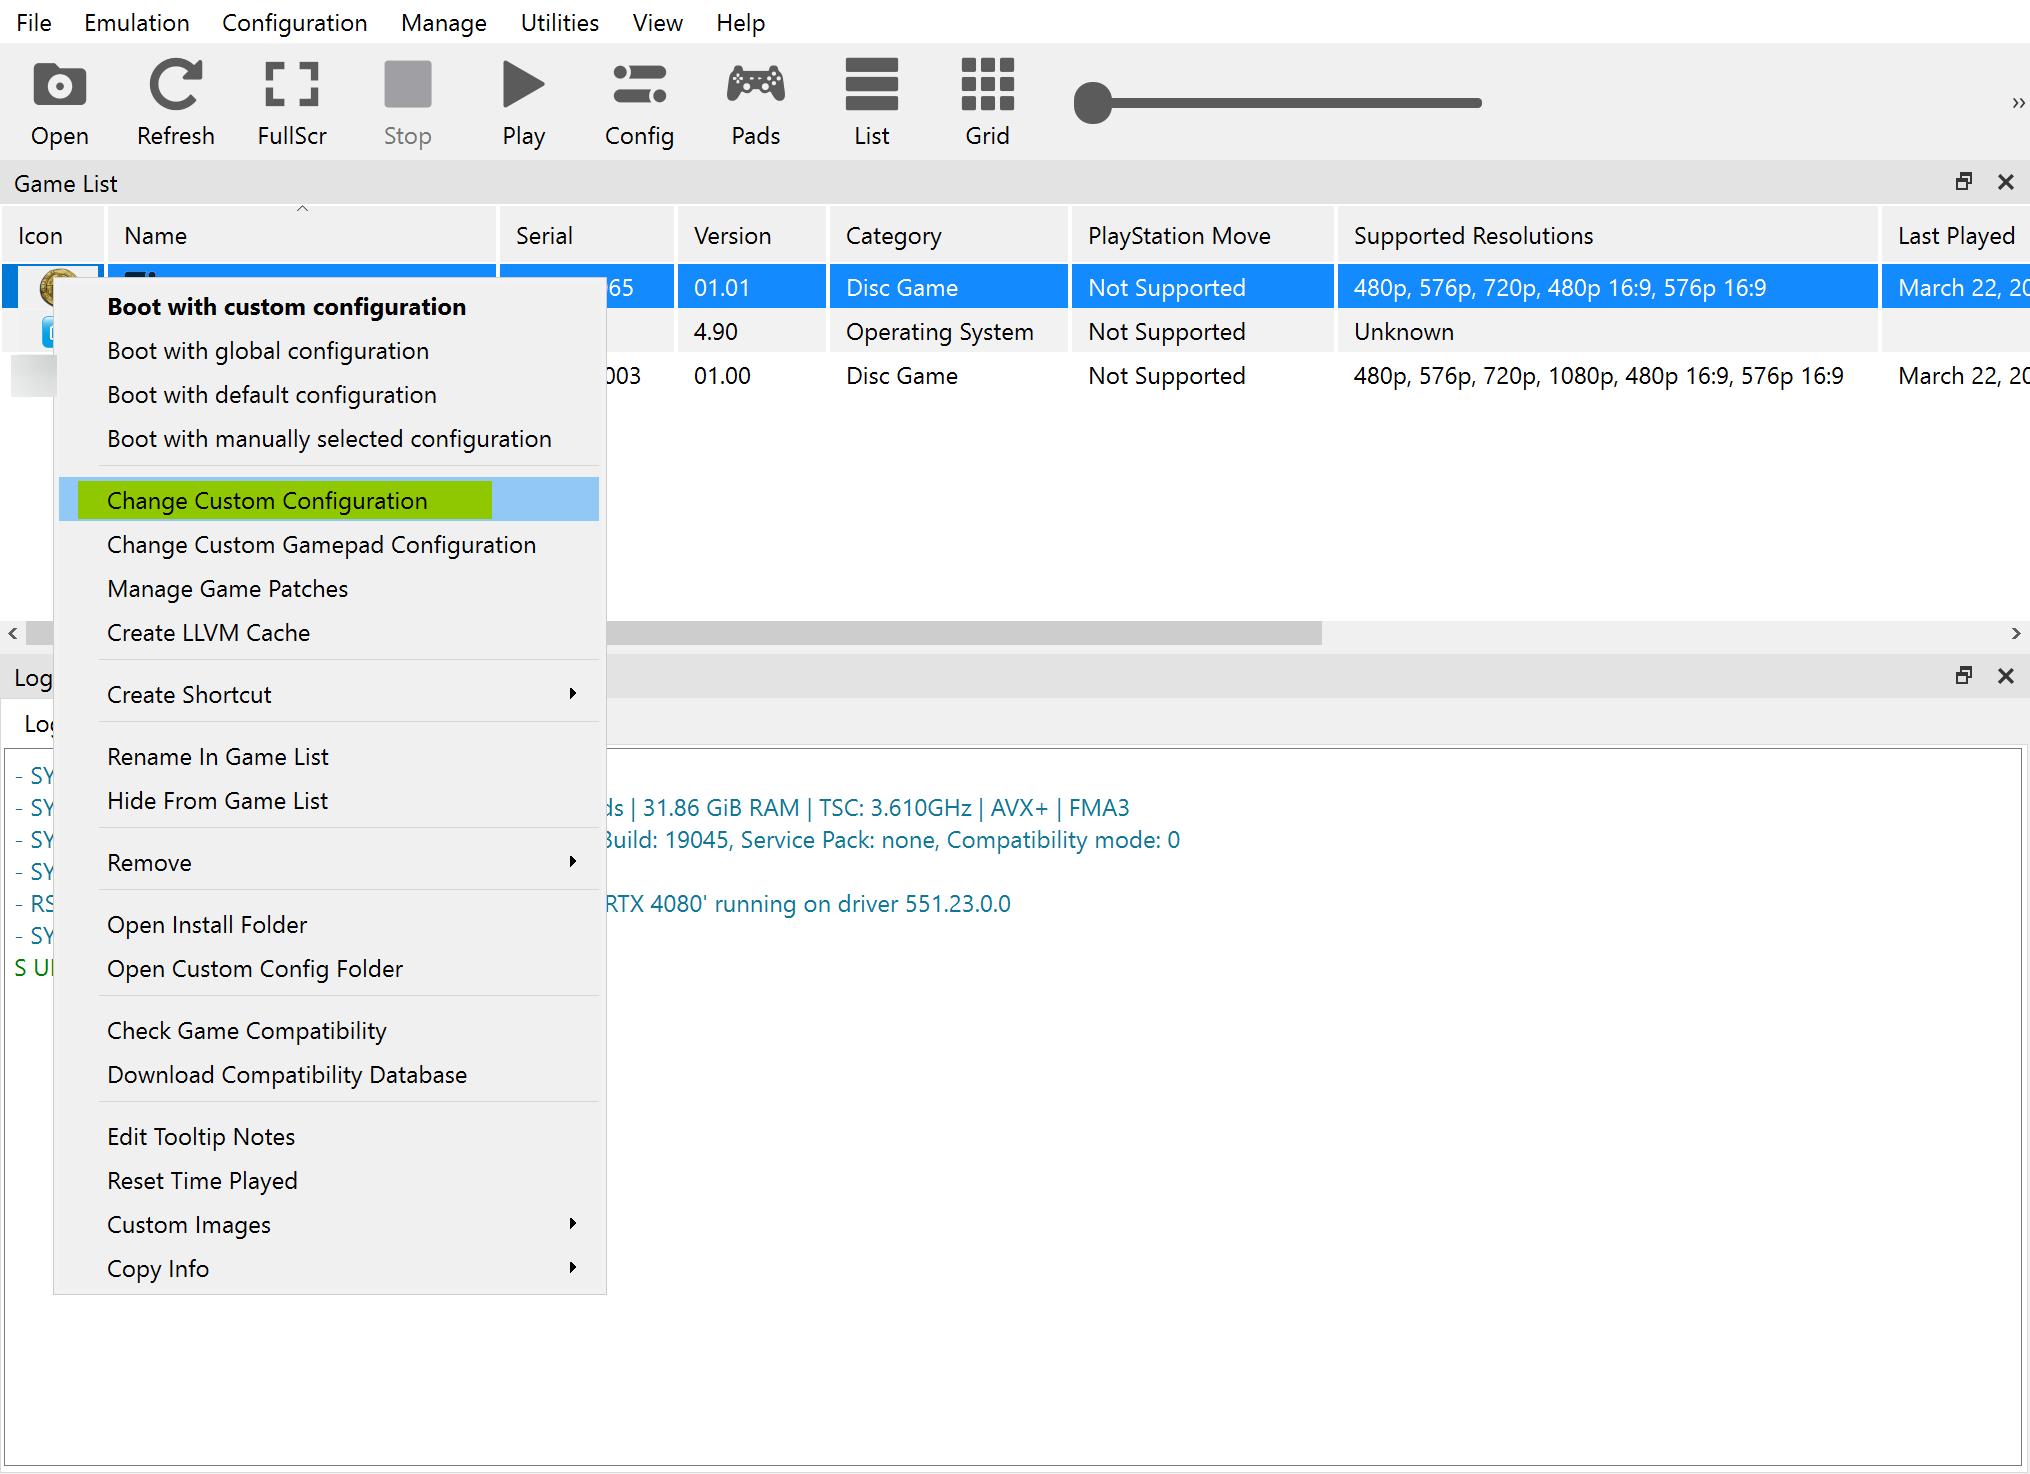
- Now right-click on the game and select “Change Custom Configuration”.
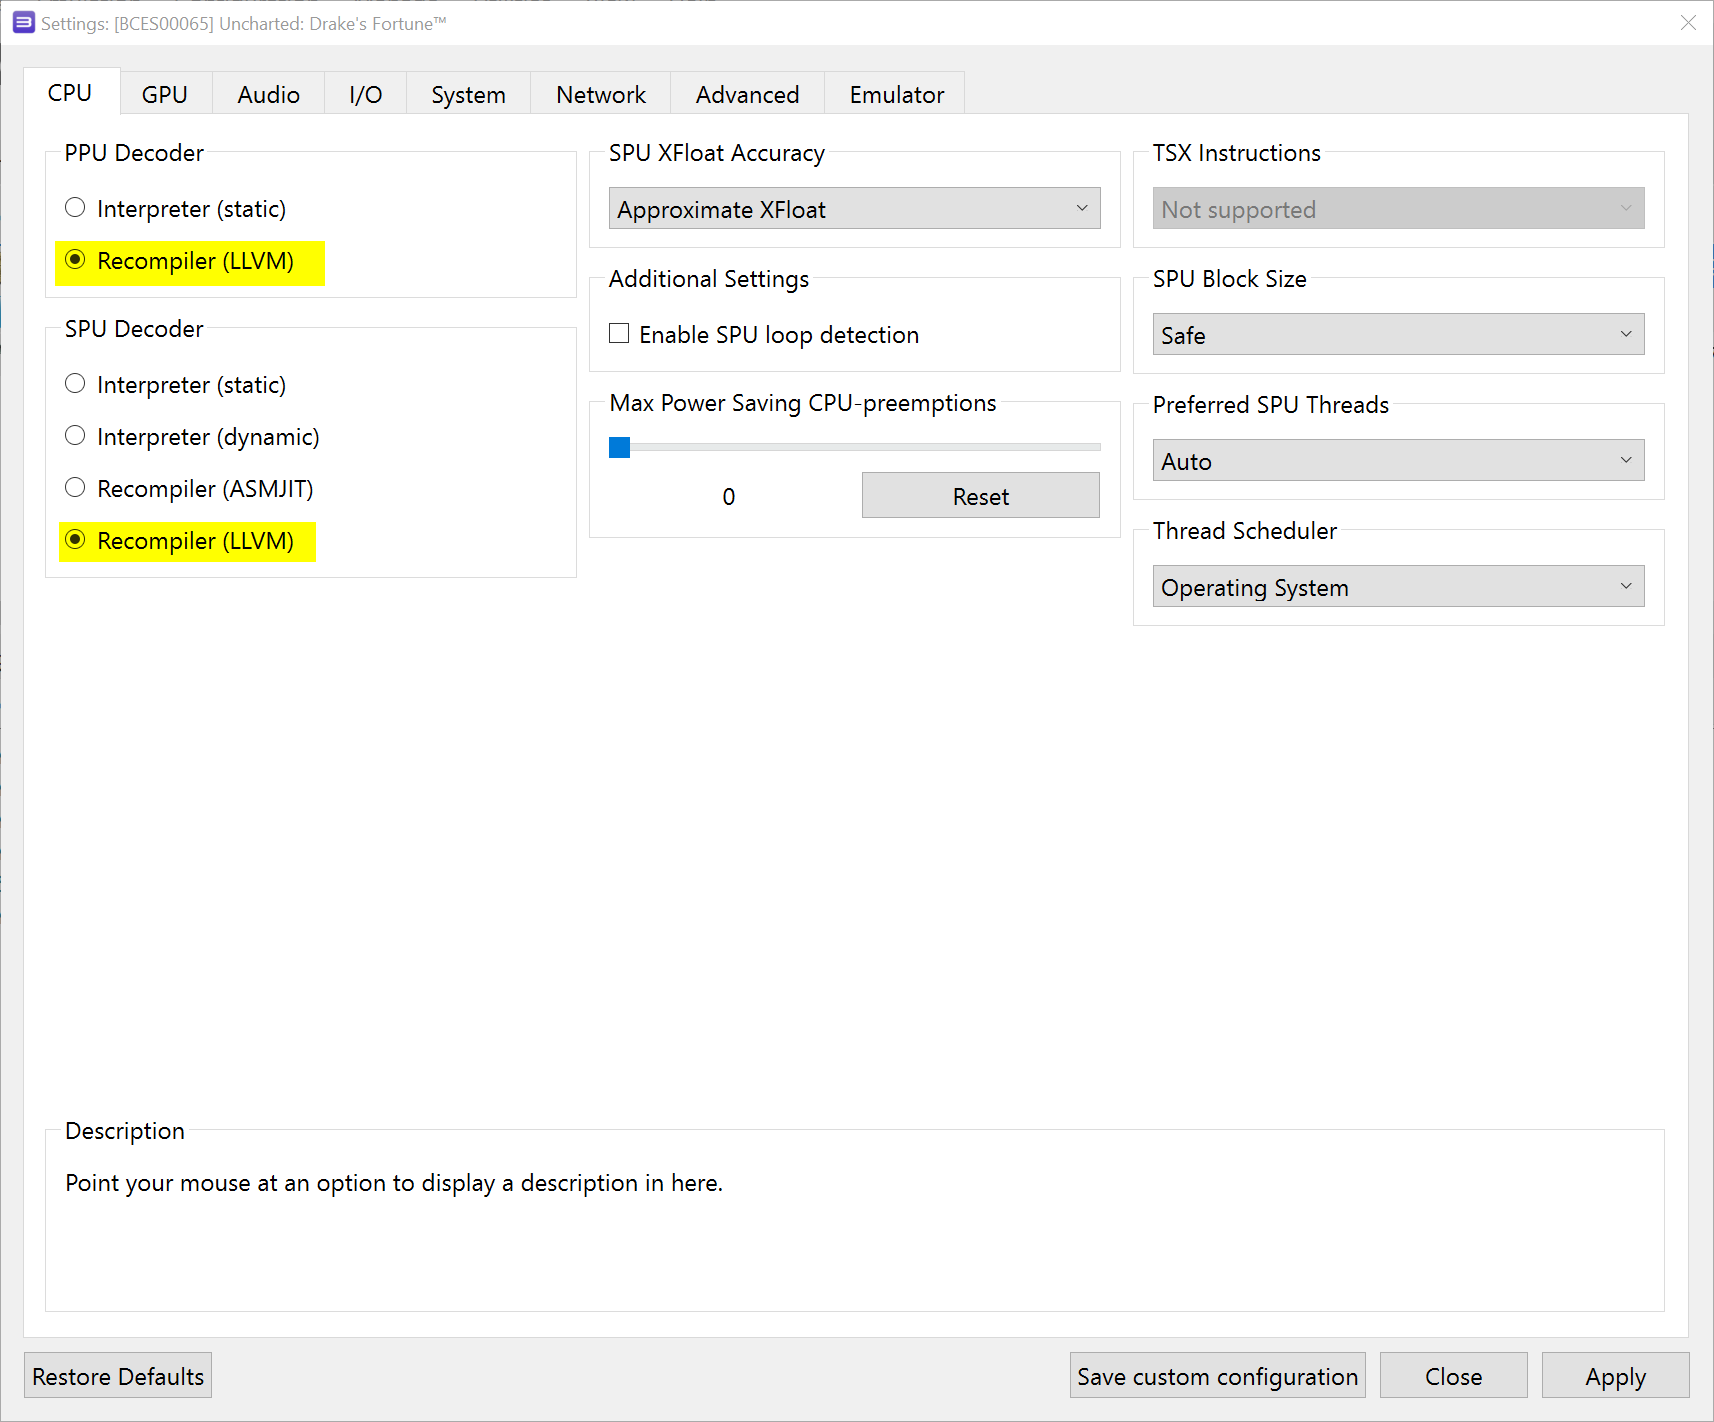
- Now we are at the configuration for the emulator’s CPU. Make sure your settings match what is shown in the screenshot.
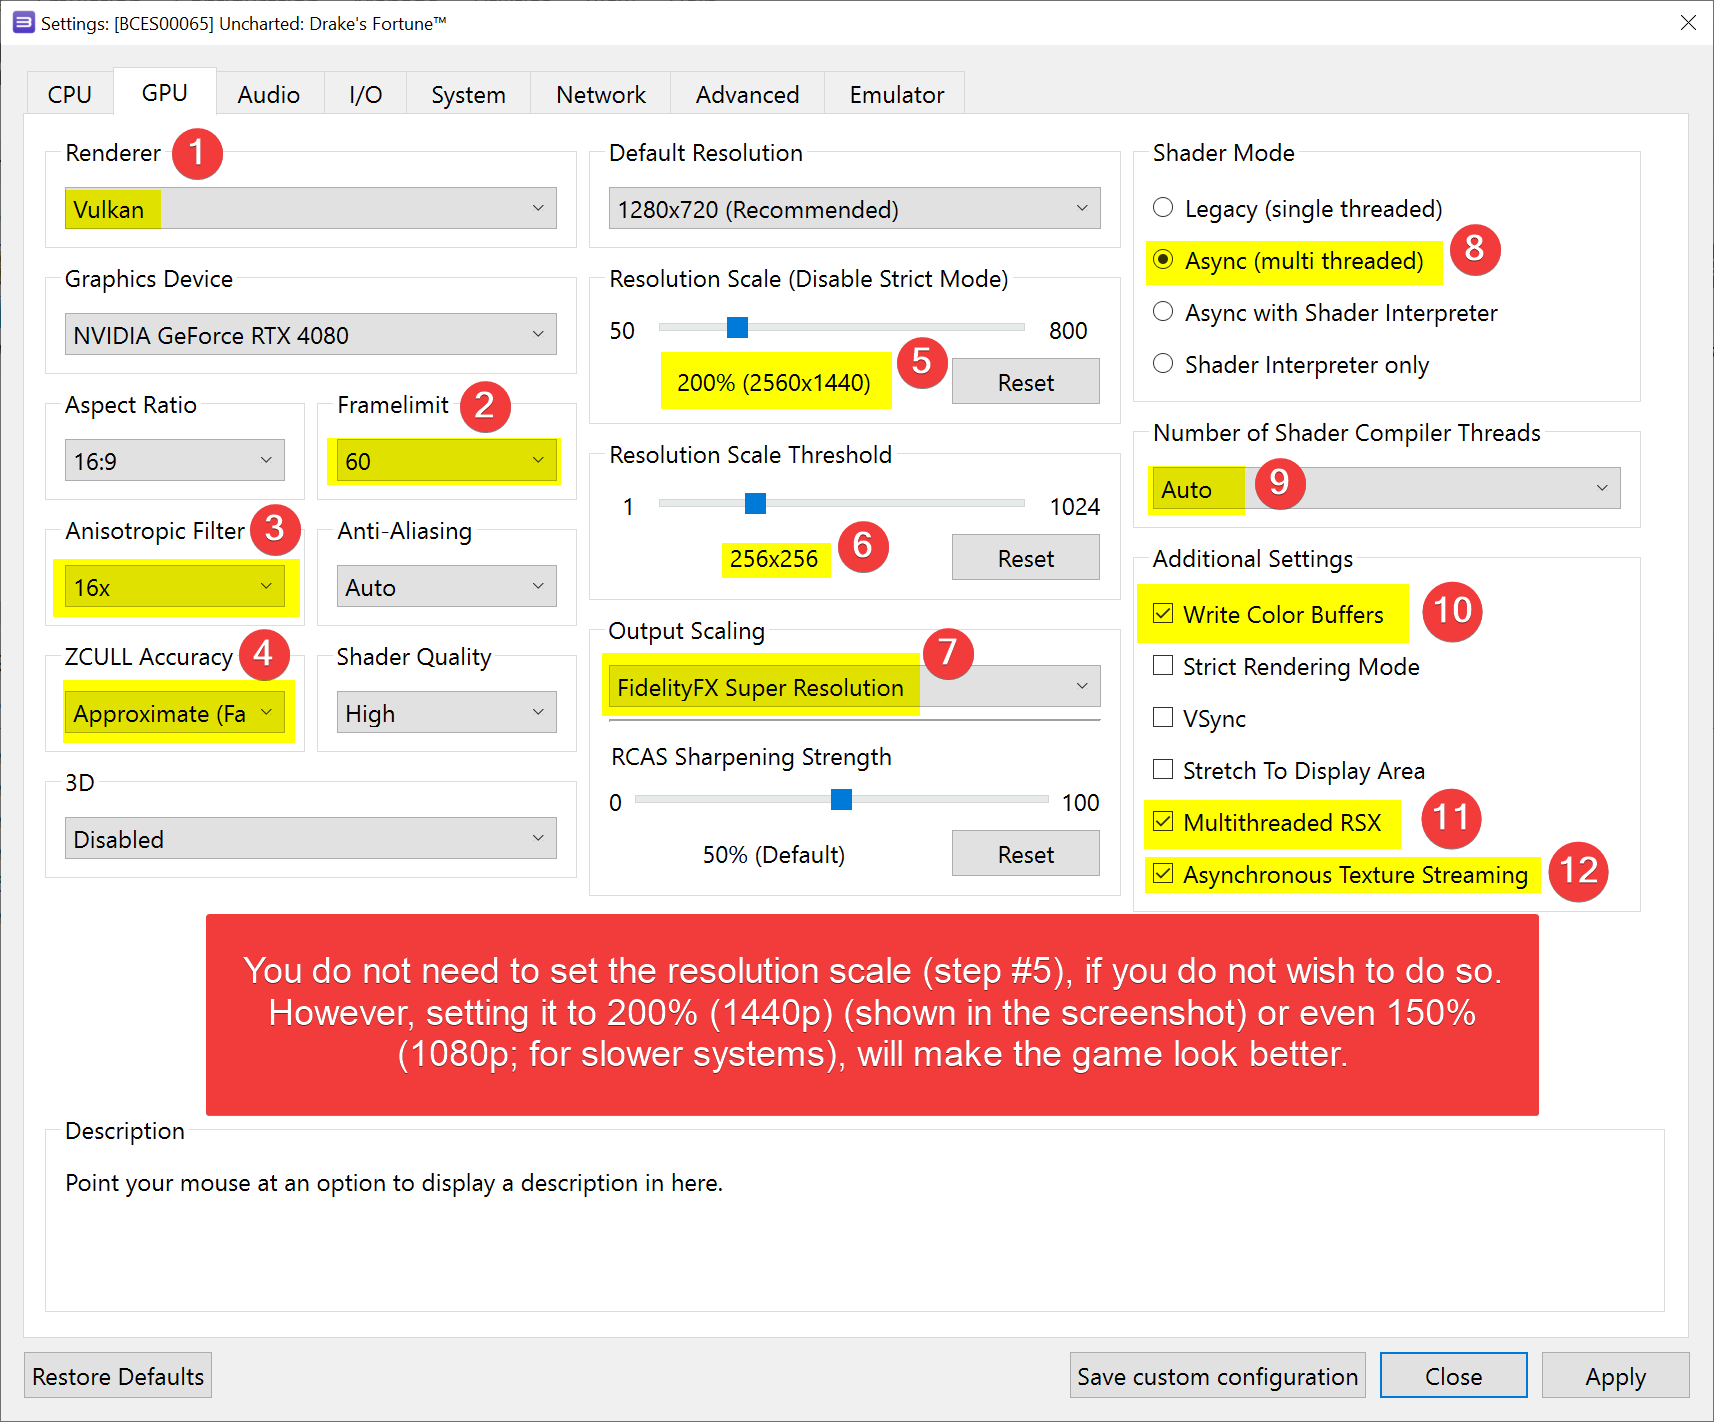
- Now click on the “GPU” tab and set your settings to what is shown in the following screenshot.
- Click on the “Advanced” tab and set your settings to what is shown in the following screenshot.

- Now click on the “Save custom configuration” button at the bottom of the configuration box.

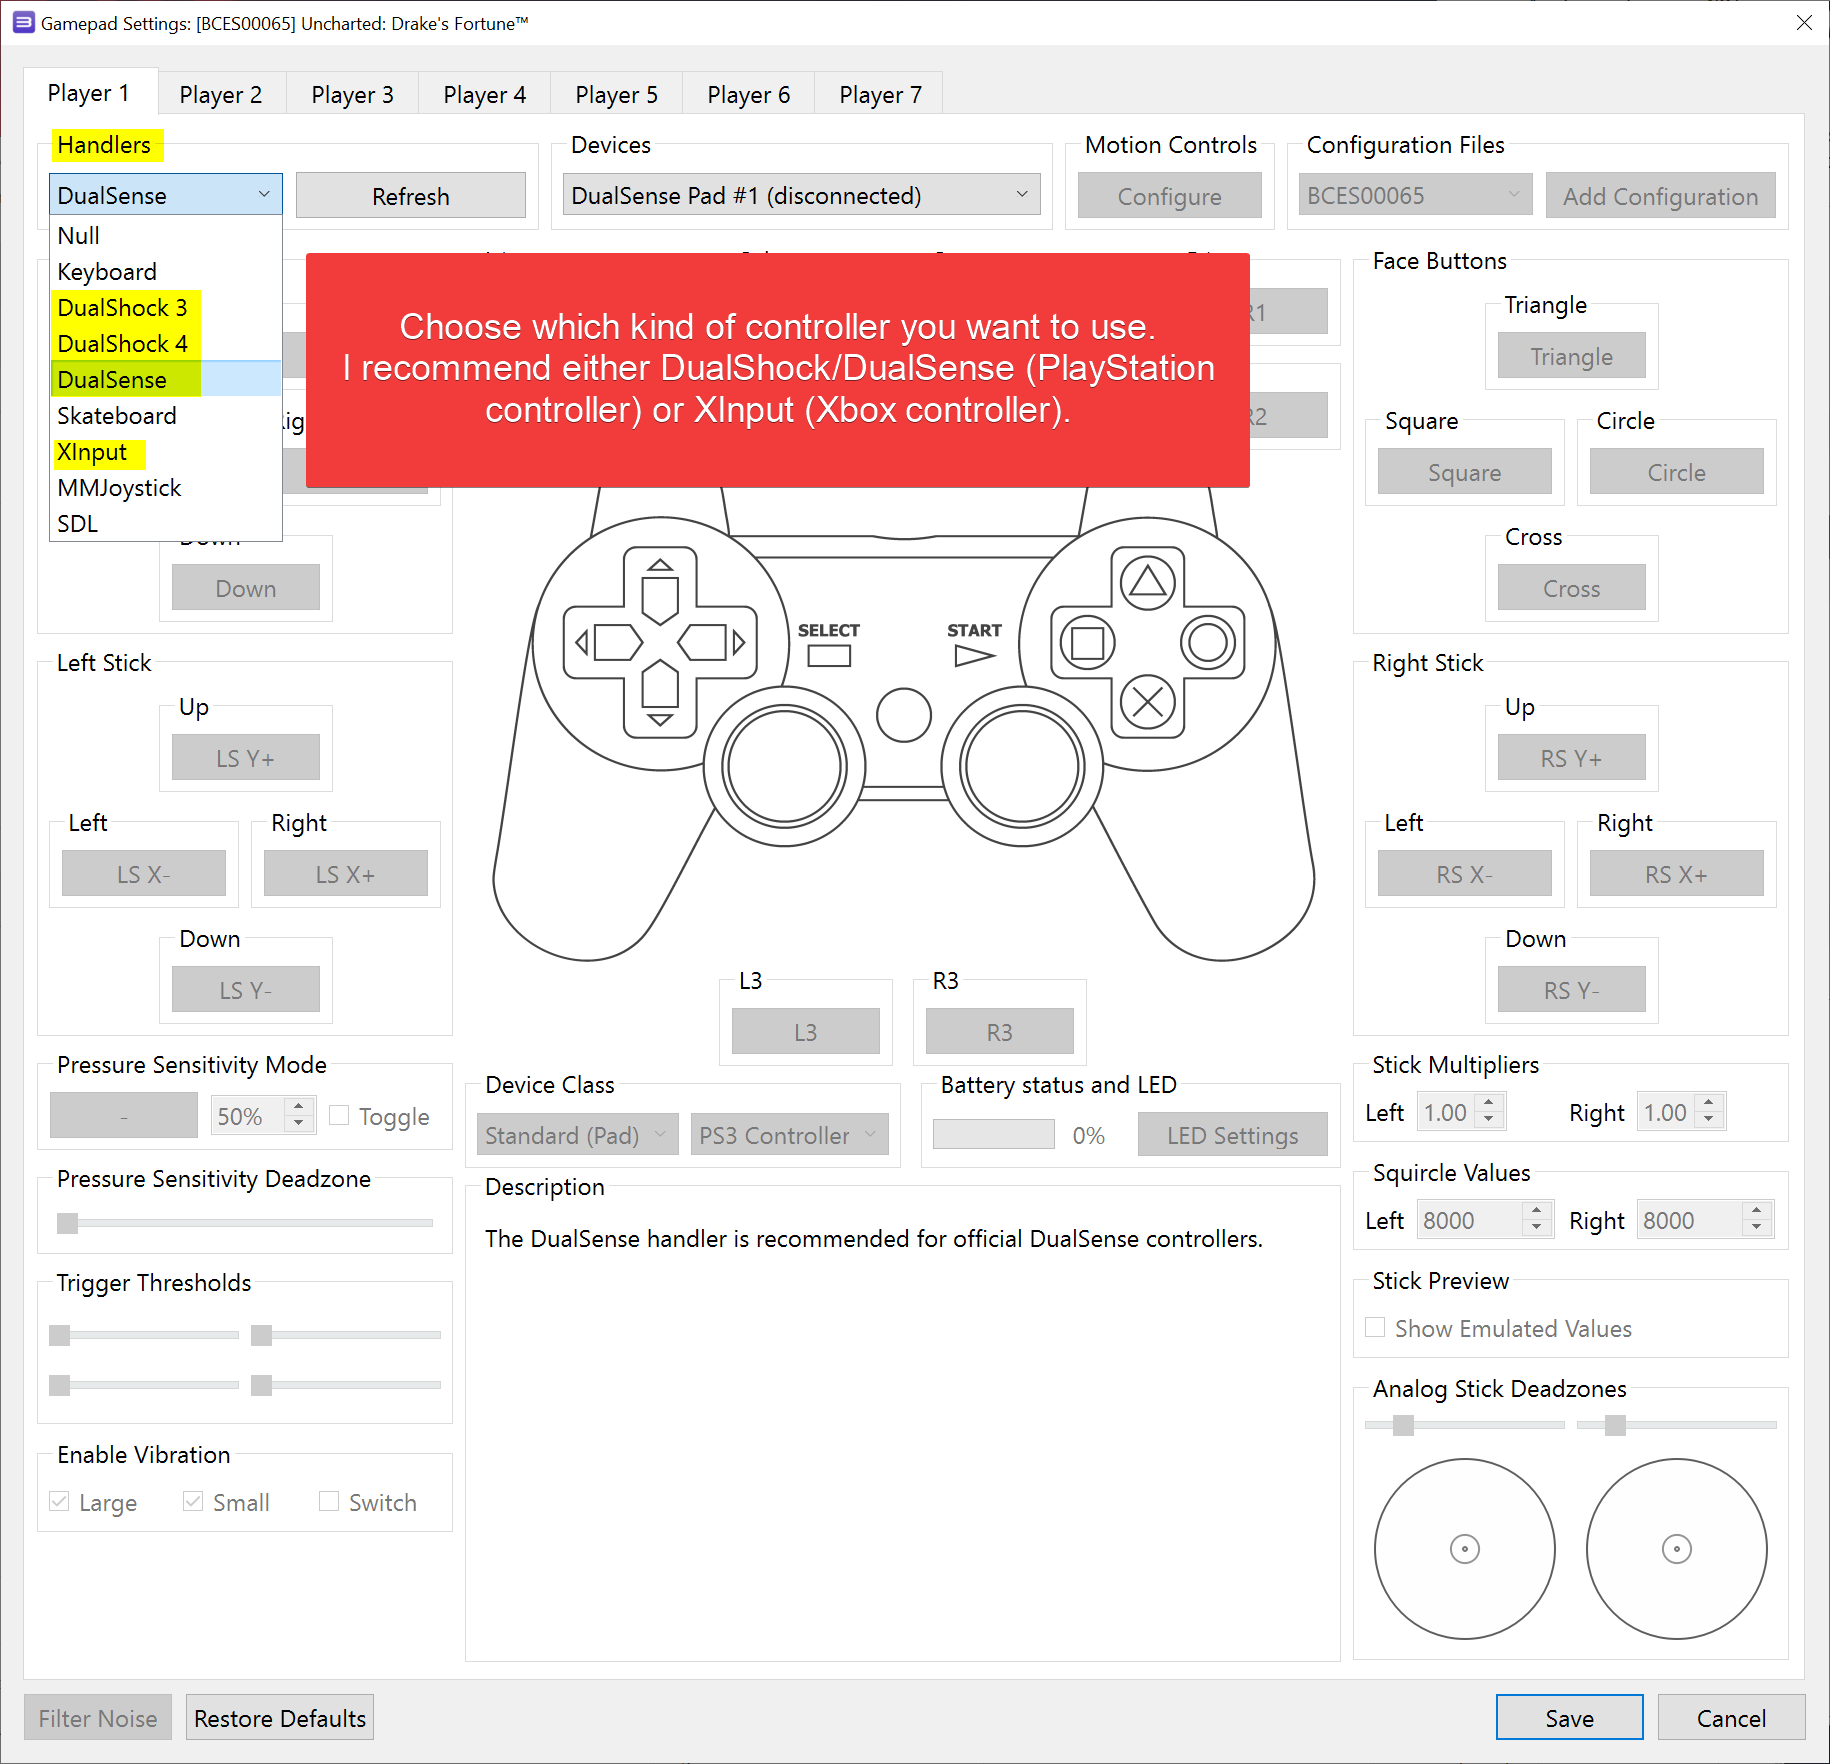
- Right-click on the game again and this time select “Change Custom Gamepad Configuration”.

- Now set your controller input type.
- Click the “Save” button.
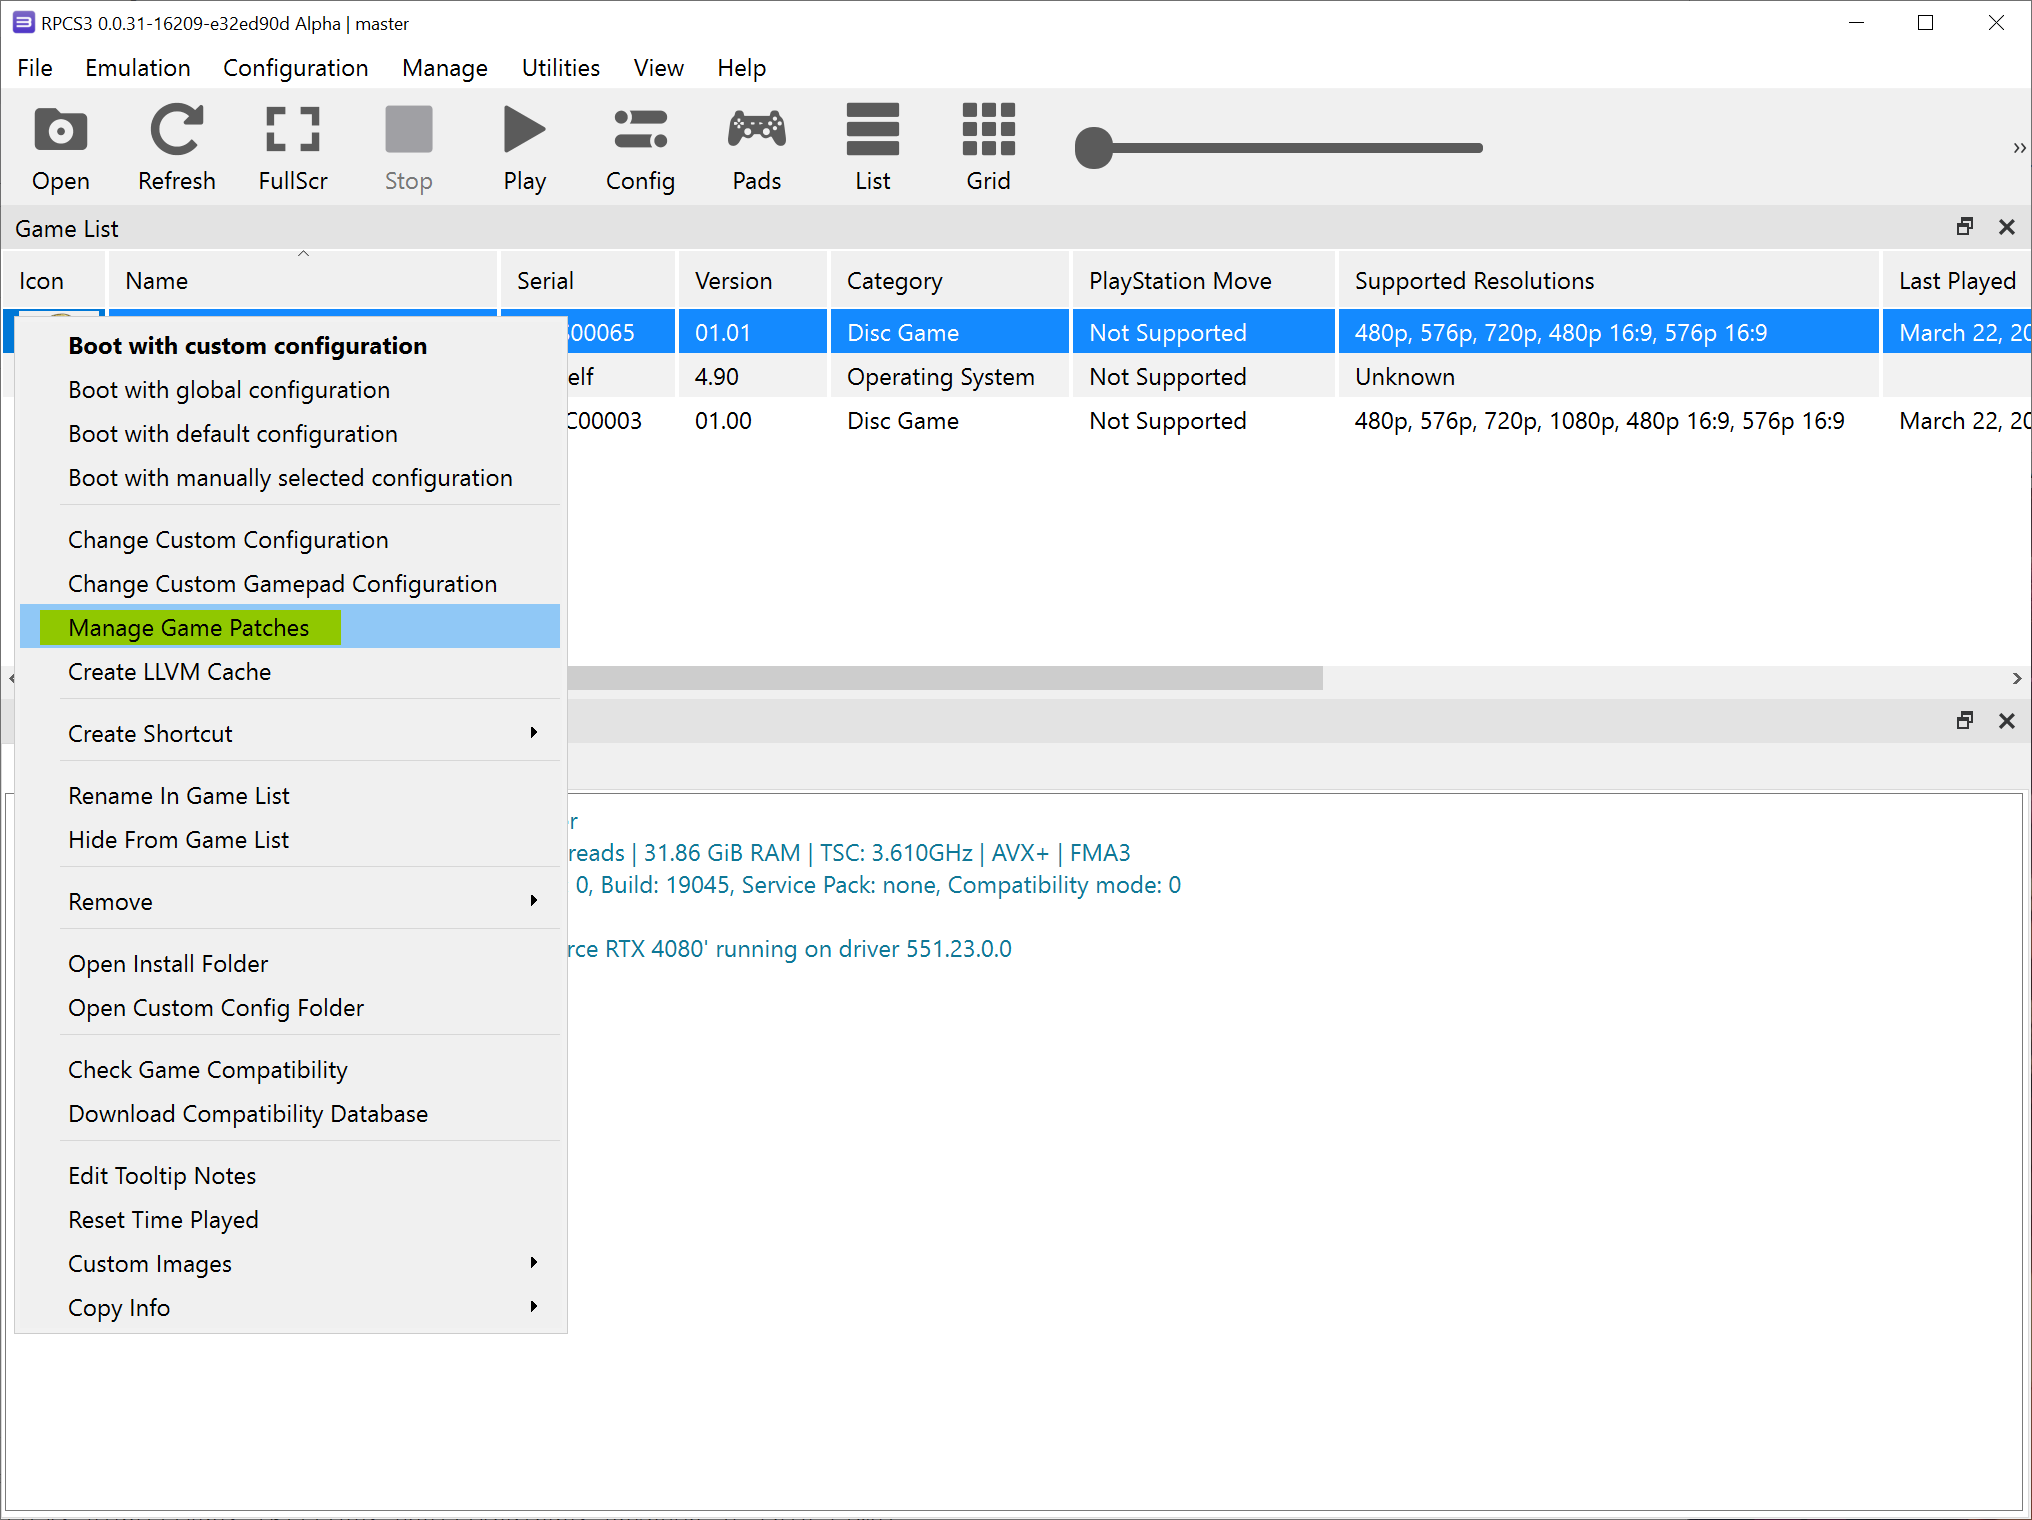
- Again, right-click on the game and select “Manage Game Patches”.
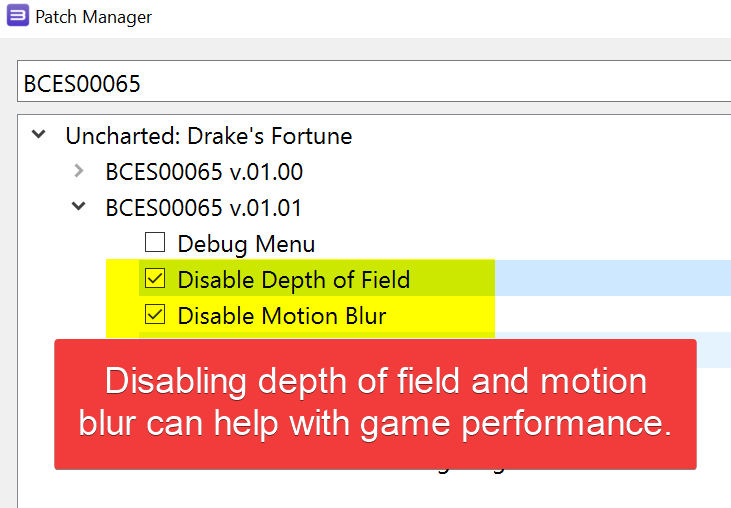
- Select the game patches as shown in the screenshot. Your version of the game may show different patches in the list. However, the two patches you want to select should still be available.
That’s it! You will want to run the game to see if everything is in working order.
Posted in Computers, Software, Tips & Tutorials, Video Games
How to Restart the Windows File Sharing Service
This quick tutorial will show you how to restart the Windows file sharing service on your Windows desktop / server. This can be useful if you encounter issues sharing files on your computer, and cannot or do not want to reboot the system.
This tutorial is intended for Windows 10 / 11 and Windows Server 2016 or later. It assumes that you have already enabled and configured Windows file sharing on your computer.
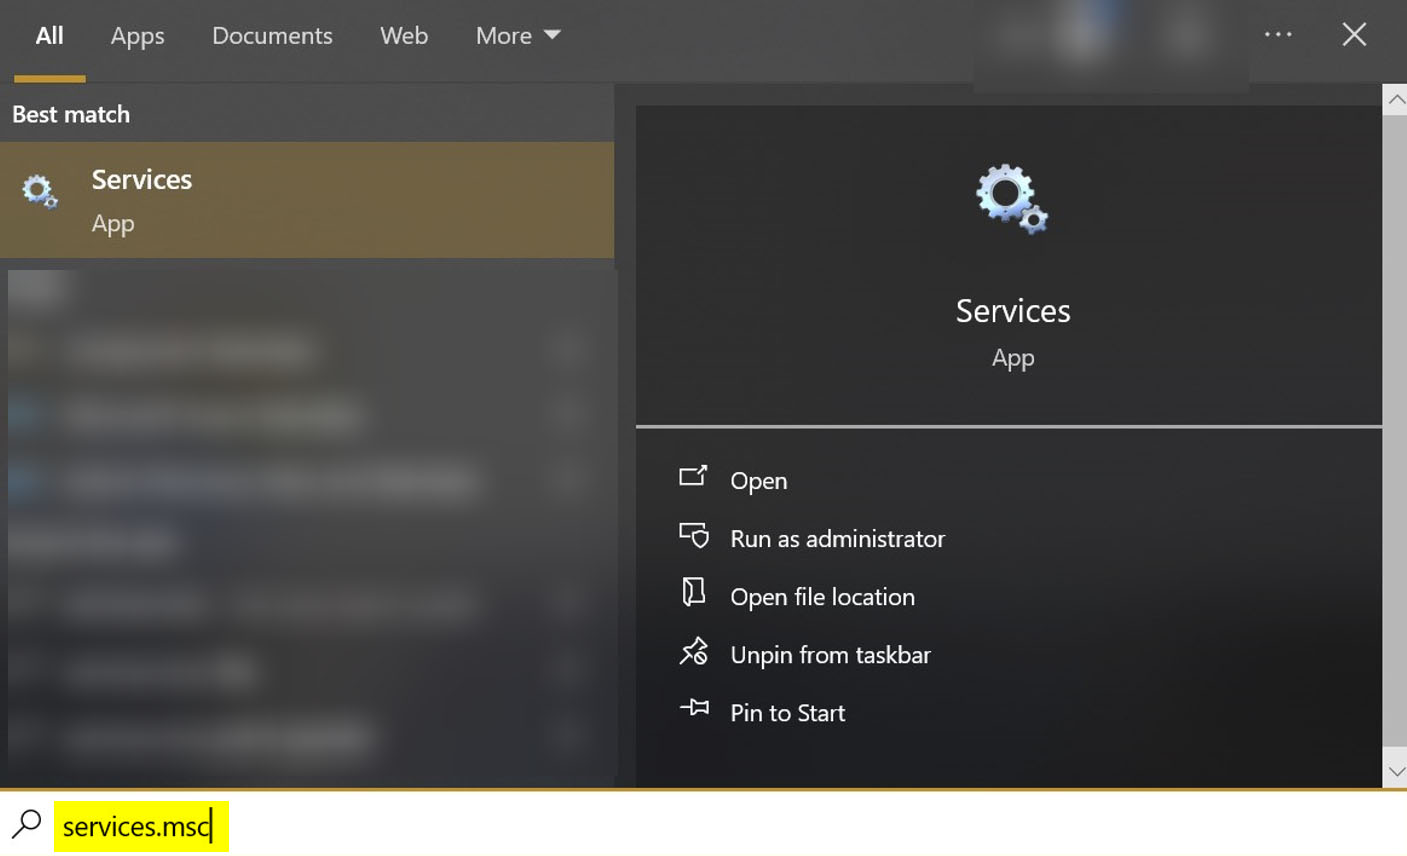
- Open the Start menu and type “services.msc” in the search box. Press Enter to open the Services window.
- Alternatively, you may use the keyboard combination Win+R to open the Windows run box and type in “services.msc”.
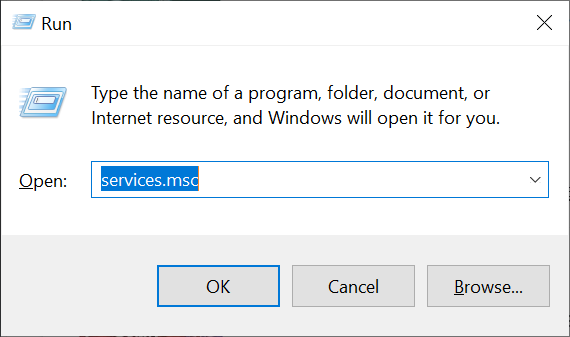
- Alternatively, you may use the keyboard combination Win+R to open the Windows run box and type in “services.msc”.
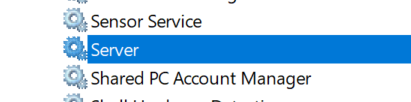
- Locate the service named “Server” in the list of services.
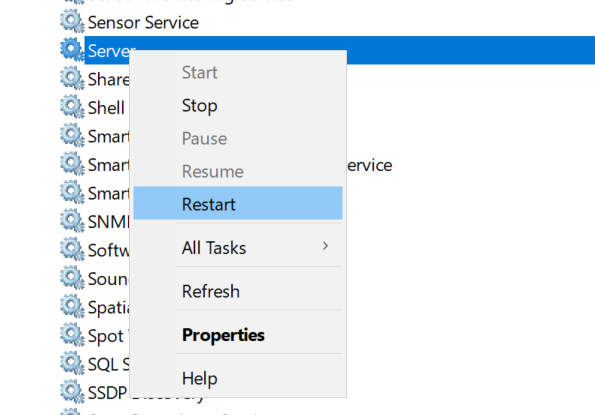
- Right-click on the service and click “Restart”. This will stop and start the service again.
- Now you can verify if your issue has gone away. If not, then a reboot might be in order.
That’s it! Hopefully someone will find this tutorial useful.
Posted in Computers, Internet and Servers, Operating Systems, Software, Tips & Tutorials
Merry Christmas 2023!

Luke 2:8-20 New American Standard Bible (NASB)
8 In the same region there were some shepherds staying out in the fields and keeping watch over their flock by night. 9 And an angel of the Lord suddenly stood before them, and the glory of the Lord shone around them; and they were terribly frightened. 10 But the angel said to them, “Do not be afraid; for behold, I bring you good news of great joy which will be for all the people; 11 for today in the city of David there has been born for you a Savior, who is Christ the Lord. 12 This will be a sign for you: you will find a baby wrapped in cloths and lying in a manger.” 13 And suddenly there appeared with the angel a multitude of the heavenly host praising God and saying,
14 “Glory to God in the highest,
And on earth peace among men with whom He is pleased.”
15 When the angels had gone away from them into heaven, the shepherds began saying to one another, “Let us go straight to Bethlehem then, and see this thing that has happened which the Lord has made known to us.”16 So they came in a hurry and found their way to Mary and Joseph, and the baby as He lay in the manger. 17 When they had seen this, they made known the statement which had been told them about this Child. 18 And all who heard it wondered at the things which were told them by the shepherds. 19 But Mary treasured all these things, pondering them in her heart. 20 The shepherds went back, glorifying and praising God for all that they had heard and seen, just as had been told them.
Posted in Biblical Accounts, Christian, Holiday
How to Enable NVIDIA RTX Video Super Resolution Upscaling Technology in Mozilla Firefox
This quick tutorial will show you how to enable the NVIDIA RTX Video Super Resolution in Mozilla Firefox.
As RTX Video Super Resolution utilizes the Tensor Cores present in NVIDIA GeForce RTX GPUs, it is exclusively compatible with graphics cards from the 30 and 40 series.
Prerequisites
- Mozilla Firefox version 116 (or above)
- NVIDIA graphics card (30 and 40 series only)
- RTX super resolution enabled via the NVIDIA Control Panel
- Open your Mozilla Firefox web browser and enter “about:config” in the search bar.

- Type in “gfx.webrender.super-resolution.nvidia” into the search box.

- Click on the toggle icon to adjust the setting to “true”.

- Now you should see the value set to “true”.

- Restart the Mozilla Firefox web browser.
You have successfully activated the feature in your web browser. It is important to note this feature is currently in an experimental phase, and you may encounter potential issues with it enabled, such as inaccuracies in image upscaling or even the feature failing to work at all on your computer.
Posted in Computers, Internet and Servers, Software, Tips & Tutorials