Simple Ways to Get Less Spam in Your Email
We have all been there. Wake up in the morning and find you have a dozen or so spam emails sitting in your inbox, all mixed in with your legitimate emails from family and business. You may have wondered how you can prevent so much spam from hitting your inbox.
The truth is …there really is no “magic formula” when it comes to fighting spam. Some people seem to never get any spam even if they give their email out to everyone they meet. For others, they seem to have been “blessed” with tons of spam, when they have been very careful who they have given their email too.
Here are some ideas that may help you prevent spam from hitting your inbox. Please remember, none of these ideas have any guarantee that you will not receive any spam.
- (As mentioned above) Be careful who you give your email out to. Never just hand over your email to just anyone (e.g., an online “signup” form to potentially win a prize).
- There are several places on the Internet where people collect email addresses to put into lists to sell to spammers. Unfortunately, many of these signup forms look legit and people fall for them, not realizing that they are getting setup to be spammed.
- Many companies that require your email have good intentions, but their systems may get compromised and their customers’ emails get leaked to spammers. In this case, that is not your fault. Life happens.
- In addition, your friends’ and family’s email accounts may become compromised at a certain point in time. This will undoubtedly cause their address books to become leaked. You can guess what the hacker will do with all the emails he collects.
- Use a third-party email spam filter (e.g., SpamAssassin).
- Some examples of third-party spam filters are: SpamAssassin, rspamd, and Gmail.
- SpamAssassin is a self-hosted software program. When your email server receives an email, it sends the email to SpamAssassin which then tries to determine if the email is legit. However, SpamAssassin also has quite the learning curve. So, unless you have time to learn how to set it up properly, I would opt to using a commercial third-party spam filter.
- SpamAssassin can be trained what emails are spam and what emails are not spam.
- rspamd is another self-hosted software program for filtering email. While not as popular as SpamAssassin, there is no reason to disregard the program, if you want an alternative to using SpamAssassin or another email filter.
- Gmail has an excellent spam filter. There are people (mainly businesses) who purposely forward all mail to a Gmail account they setup to have Gmail’s system filter out the illegitimate emails. They can do this even if they own their own domain name, and are not using a Gmail email address for their business.
- Since Gmail is not self-hosted, all your email ultimately gets seen by a third-party. Some individuals and businesses may not be comfortable with this idea.
- SpamAssassin is a self-hosted software program. When your email server receives an email, it sends the email to SpamAssassin which then tries to determine if the email is legit. However, SpamAssassin also has quite the learning curve. So, unless you have time to learn how to set it up properly, I would opt to using a commercial third-party spam filter.
- Some examples of third-party spam filters are: SpamAssassin, rspamd, and Gmail.
- Use a “catch-all” anti-spam system.
- What a “catch-all” system does is redirect all your email to a “bin” of sorts and lets you – later – review all the email you wish to forward to your email.
- An example of a program that does this is “Tagged Message Delivery Agent (TMDA)”.
- You can do a Google search to learn more about it.
- The only downside to this type of anti-spam is you now effectively have two emails to manage instead of one. You must watch and manage the “anti-spam bin” and you still must monitor your real email. For many people, this would not be acceptable or practical.
- Use an email alias instead of giving out your real email.
- This is when you have multiple email addresses that all forward to your real (main) email address.
- This is like having a forwarding address at the US Post Office.
- For example, you have your personal email: alfred@example.com. Now you want to sign up for a new online service, but you do not want to give out your personal email. You setup an alias ad130@example.com and give that email to the online service instead of your actual email. Now anytime the service emails you, the email is forwarded from ad130@example.com to alfred@example.com.
- In the event the service gets compromised and you start getting spam to ad130@example.com, you can create another one ad250@example.com and continue using the service while stopping the spam that started coming to the other email alias.
- Unfortunately, there are a couple of problems with this idea.
- 1. With several email aliases, you must now keep up with all these virtual email accounts, instead of just one (your main email).
- 2. Unless you are self-hosting your email, in which case you can set as many email aliases as you need, some free email services may not allow you to create 20+ emails for the purpose of forwarding to another email address. It would depend upon the email service’s “Terms of Service” …what they allow and do not allow.
Posted in Computers, Internet and Servers, Software, Tips & Tutorials
List of Free and Public DNS Resolvers
Here is a list I compiled of free and public DNS resolvers you can use. Hopefully this will save you some time looking for an alternative DNS resolver.
Last Updated: August 2022
| Name | IP Address & Notes |
| Cloudflare |
1.1.1.1 1.0.0.1 No DNS filtering; everything allowed |
| Cloudflare |
1.1.1.2 Filters malware domains; useful if you have a public Internet service (e.g., library, coffee shop) |
| Cloudflare |
1.1.1.3 Filters malware & adult content |
|
8.8.8.8 8.8.4.4
|
|
| Quad9 |
9.9.9.9 149.112.112.112 2620:fe::fe [IPv6] 2620:fe::9 [IPv6] Filters malware domains & DNSSEC validation |
| Quad9 |
9.9.9.11 149.112.112.11 2620:fe::11 [IPv6] 2620:fe::fe:11 [IPv6] Filters malware domains & DNSSEC validation + ECS enabled |
| Quad9 |
9.9.9.10 149.112.112.10 2620:fe::10 [IPv6] 2620:fe::fe:10 [IPv6] No malware domain filtering, no DNSSEC validation |
| OpenDNS |
208.67.222.222 208.67.220.220 Without an OpenDNS account, supposedly it blocks some malware and phishing domains; with an account, you can have much more control over what it blocks and does not block |
Posted in Computers, Internet and Servers, Software, Tips & Tutorials
How to Set Up NVIDIA G-Sync for Gaming
Below I will give you my personal NVIDIA control panel settings I use for G-Sync that gives me smooth game play (results may vary).
Prerequisites
- NVIDIA video card (obviously)
- latest NVIDIA drivers
- Windows 10 or above
- these settings should work in older versions of Windows, but I have not tested that assumption
- G-Sync or FreeSync compatible monitor
- FreeSync is AMD’s version of G-Sync
- NVIDIA (thankfully) allows FreeSync monitors to work with their proprietary G-Sync technology without you having to fork out a lot of money for a G-Sync “certified” monitor.
- You must enable your monitor’s G-Sync or FreeSync technology (it is usually disabled by default)
- On my FreeSync monitor (Samsung LS28AG700N), the setting is called “Adaptive-Sync”. I do not know if other FreeSync monitors have it labeled “Adaptive-Sync” too, but the naming should be similar.
- If you own a real G-Sync monitor, look for a similar option to enable.
- Set your monitor to use 120Hz or higher refresh rate
- While you can use G-Sync with a 60Hz refresh rate, it really does you no good (I tried it; waste of my time; G-Sync works better with a 120Hz or higher refresh rate).
Ok. First you need to open the NVIDIA Control Panel. Usually you can right-click on your Windows desktop and select “NVIDIA Control Panel”.
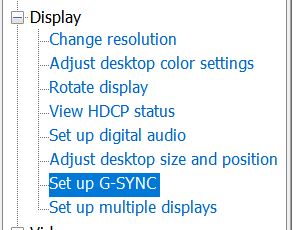
Once the NVIDIA Control Panel opens, click on the option called “Set up G-SYNC”.
Please note that this option will not be visible if your monitor’s FreeSync (“Adaptive-Sync”) or G-Sync technology is not turned on.
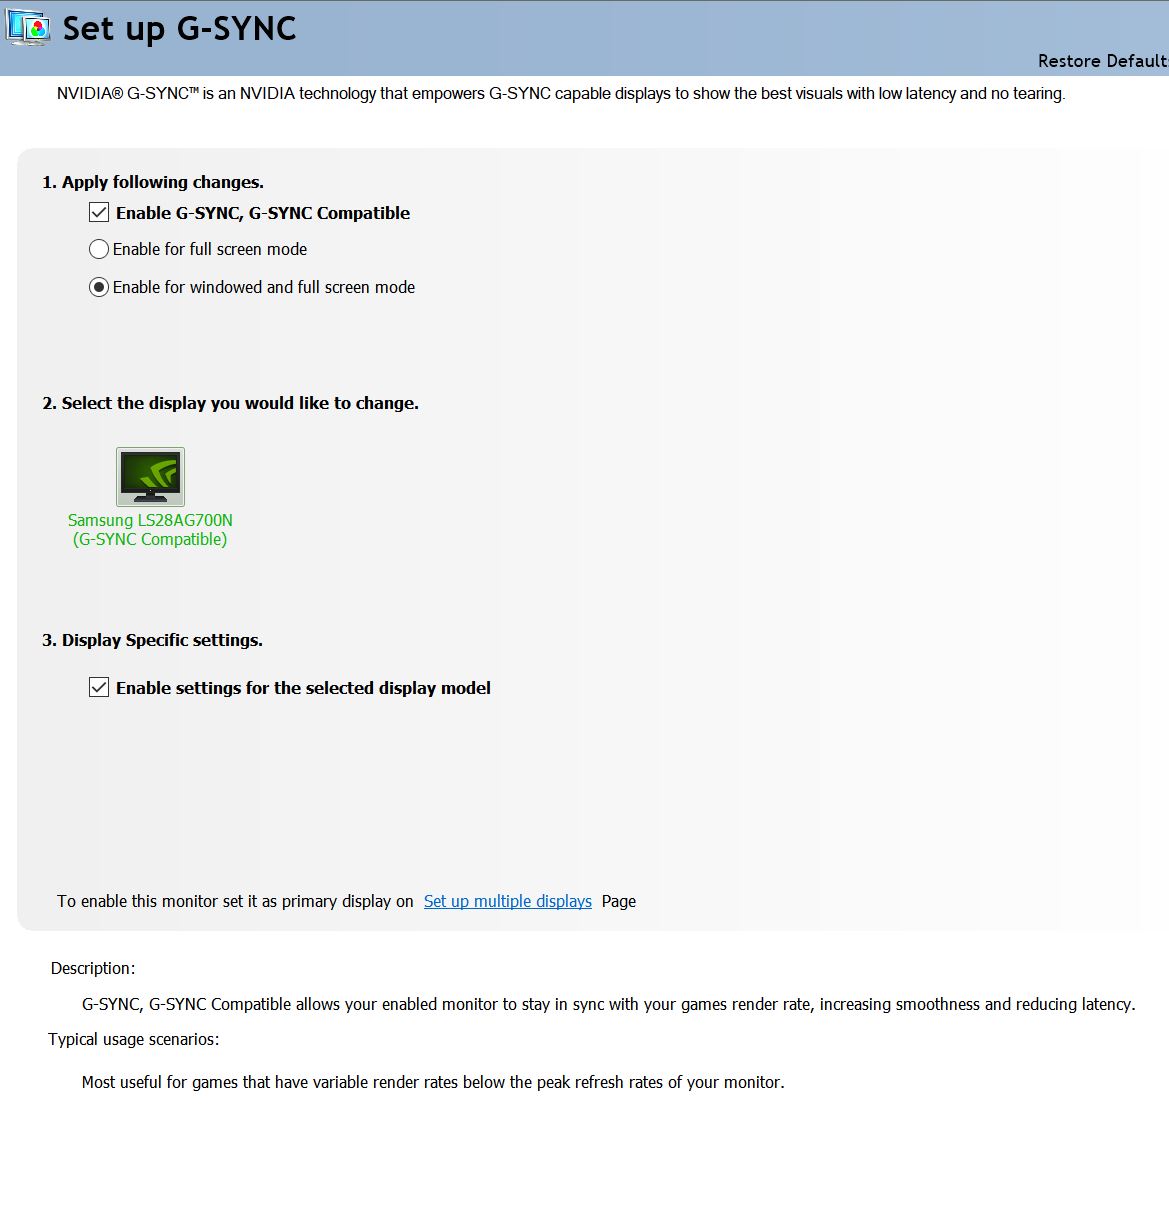
Now set your settings just like I show in the picture below.
Once you set the settings, you need to click on the “Apply” button to save your settings.
Before we go on, you may want to turn on the G-Sync indicator as shown below.
This will tell the NVIDIA driver to display a green “G-Sync” text on the top-right of a window or full-screen application that is currently making use of G-Sync. This is a very helpful indicator letting you know if your G-Sync is working properly in a particular program.
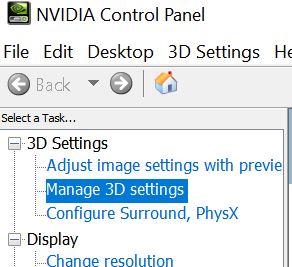
Now we need to go to setup a few more things. On the menu to the left, click on “Manage 3D settings”.
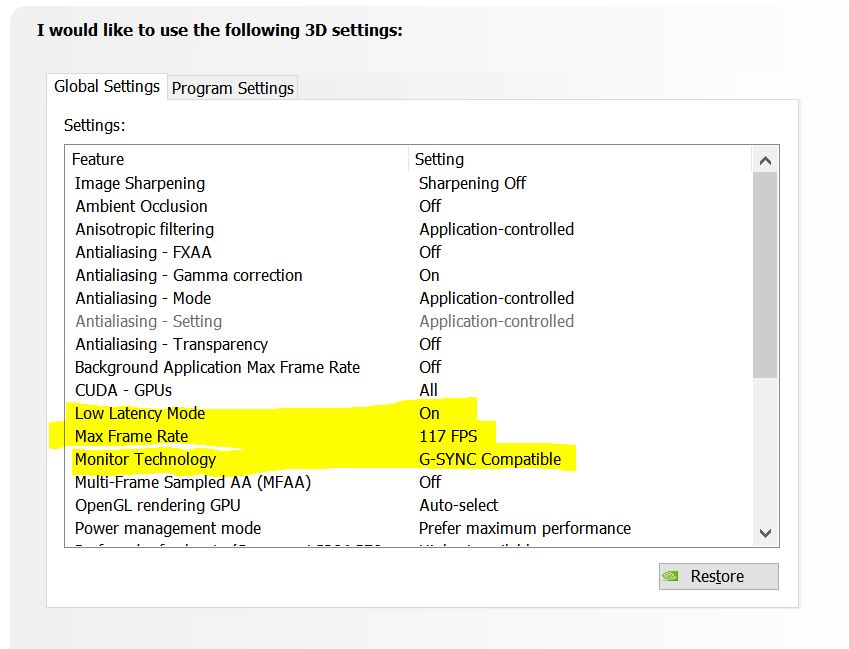
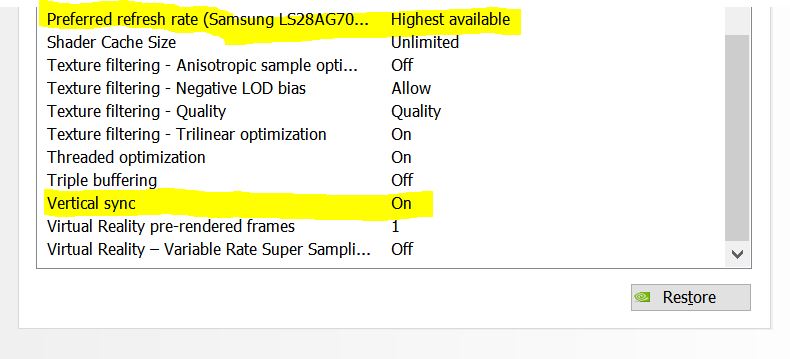
Below I have highlighted the settings I use specifically for G-Sync. Set your settings like I have shown below.
Important Note: The “Max Frame Rate” works well when it is -3 your monitor fresh rate. For example, if your monitor is running at 120Hz (like mine), set the “Max Frame Rate” to 117 instead of 120. This works well for me. Likewise, if you have a 144Hz monitor, set the “Max Frame Rate” to 141 instead of 144.
Important Note #2: If you have frequent stuttering when playing games, try setting the “Low Latency Mode” to “Off” and see if that solves the problem. “Low Latency Mode” does not always play nice with everyone’s computer systems and games.
Scroll down to view the rest of the options.
As mentioned before, please remember to click the “Apply” button to save your settings.
G-Sync should now work. Open up a video game and – if you enabled the G-Sync indicator I mentioned earlier – you should see a green “G-Sync” text on the upper-right of your screen.
I hope this small tutorial has been helpful to someone.
Posted in Computers, Software, Tips & Tutorials, Video Games
Let’s Encrypt – Free SSL/TLS Certificates for Your Website
If you have a personal or small business website that you wish to secure via an SSL/TLS certificate, you can use Let’s Encrypt to do it for free.
It used to be when you needed web encryption for your website, you had to go to a certificate authority and pay for one. What is worse, the certificate would have to be renewed every so often. It depended upon how many years you paid for in advance.
If you opted not to renew your certificate, your web visitors would see a scary message telling them “Your connection to the website is not secure!”.
Technically the “your connection is not secure” message is incorrect. An expired certificate can still secure your connection to a server, assuming you have not enabled HSTS for your domain. It’s only that the web browser – and other software – will no longer “trust” the certificate because it has expired.
Some services give their users a user-friendly option to setup a Let’s Encrypt certificate for their website. However, for people like me with custom setups, we must use other less user-friendly solutions.
If you are interested, here is the “Getting Started” link: https://letsencrypt.org/getting-started/
Posted in Computers, Internet and Servers, Security, Software

